Multiple users can access the organisation’s data.
Once added, a user can be set up to possibly:
You can set them up to see all sites or just a limited number.
You can set them up with full admin rights or limited privileges.
You can determine which notification groups they are in, and consequently which alarms they will receive.
A user can log in to the phone app to then receive alerts to their phone as well.
Adding users to the system requires:

Click on Settings in the main menu.
Click on Users.
Click on the Invite User button in the top right of the page.


Users can be either:
If you have a larger organisation with multiple sites, then it is possible to restrict users’ access to just the sites where they have responsibility.
e.g. A chemist group with four stores might have one organisation-level user (the boss) and then a number of site-specific users at each store.
Most Clever Logger organisations, however, have a single site, so all users can be organisation-wide level.

Just leave the Org-wide access switch at the default On position.
Choose an Organisation Role.
Find out more about User Roles in the link below:
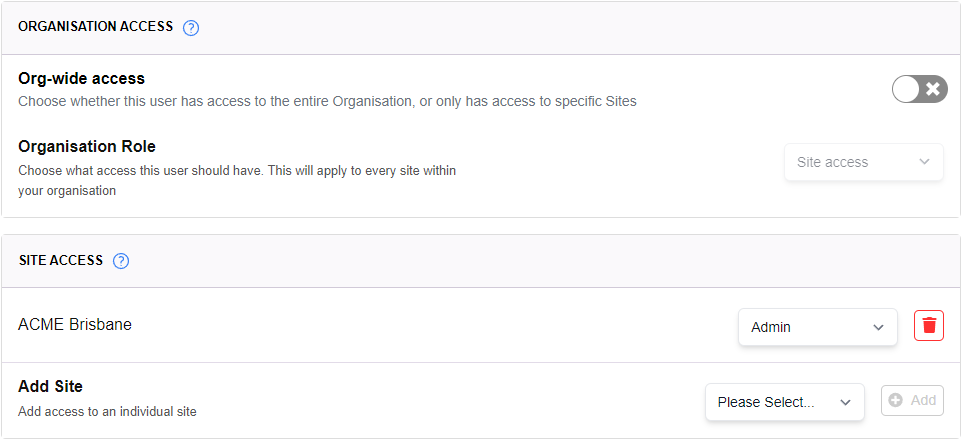
Turn off the Org-wide access switch to display the Site Access section.
In the graphic above, the user has an Admin role in ACME Brisbane.
To change their Role, select a different role from the dropdown.
To remove them from that site, simply click the Trash icon.
To add the user to a different site, select a site from the dropdown menu and click the Add button. Then confirm the user’s role.


On the next screen, you can confirm which Notification Groups should include the new user .
Default groups will be suggested based on the settings in those groups.
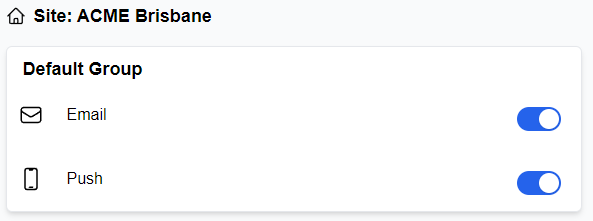
Select your preferences by switching contact methods off or on for each group.

Select which reports the user will get using the switches.

Click the Next Step button to finish the process.
The new User will receive an email with an invitation to log into Clever Logger.
They will also be able to download the app and log into it with their email address.
Clever Logger is sold to government departments, public and private hospitals, and other large corporations. We understand that it’s often not possible to purchase with a credit card on a web site.
Call us on 1300 80 88 89 or send an email to [email protected] and we’ll send you a written quote. We are happy to send out most orders on receipt of a verified purchase order.


All prices are in Australian dollars and include GST

KEEP BATTERIES OUT OF REACH OF CHILDREN
Clever Logger loggers are intended for commercial use only. They contain small batteries. Swallowing can lead to chemical burns, perforation of soft tissue, and death. Severe burns can occur within 2 hours of ingestion. Seek medical attention immediately.
To prove it, we’ll send you a Starter Kit to try out for a whole month.
Set it up, have a play, explore the features – obligation free.
If you love it, just let us know.
If not, just send it back.

The National Association of Testing Authorities (NATA) is the recognised national accreditation authority for analytical laboratories and testing service providers in Australia. It is an independent, not-for-profit organisation that provides independent assurance of technical competence.
NATA accredits organisations to perform testing and inspection activities for their products and services. This gives consumers the assurance they need to make safe, healthy and reliable choices .
In the top right corner of the Location page, you will find the View chooser.
There are three options: Simple, Detailed and Gauge.
