Easy to use temperature data logger - logo

Adding a Gateway to your Clever Logger account

SEE ALL TOPICS
CLOSE
The Guide logo
Your Account

ON THIS PAGE

What is a Clever Logger Gateway?

The Gateway is the link between your loggers and the internet.

It generally sits outside the fridge of freezer. It is connected to main power. It is also connected to the internet, either with an ethernet cable or via wi-fi.

Clever-Logger-Gateway-connected-to-Ethernet
Step 1 Icon

Adding the gateway in the dashboard

Open the Clever Logger dashboard in your web browser – cloud.cleverlogger.com

Choose Gateways from the main menu on the left.

Click on the Add Gateway button.

add gateway button
Step 2 Icon

Choose your gateway

In most cases, your gateway will be model CLG-01.

Click on the green Setup Gateway button under the CLG-01 icon.

Choose your site

If you have more than one site, choose the site this gateway will belong to. If you only have site, your gateway will be added to that site by default.

setup-gateway
Step 3 Icon

Enter the gateway details

On the bottom of the gateway is a sticker with the Serial Number and PIN.

Enter these details in the dashboard form.

Gateway-with-serial-number-and-PIN
Step 4 Icon

Name your gateway

Give your gateway a name. Choose something that will help you distinguish the gateways on your account.

You can also give your gateway a description. It is often useful to describe where the gateway will be located so that you can find it easily at a later date. e.g. Under Julie’s desk.

Check your time zone and location information is correct and click the Next Step button.

Step 5 Icon

Configure the gateway alarm settings

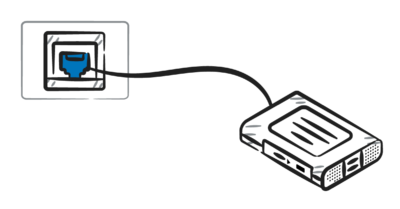
Your gateway can notify you if it loses its connection to the internet, as will happen in power failure.

On this screen, you can choose the delay between when a power or internet outage is detected and when you are notified. You can also choose who will receive these alerts.

In most cases, you can just accept the default settings on this page. Remember that you can easily change these settings at any time in the future.

Click on the Review All button to move to the next step.

Step 6 Icon

Review details and finalise

The final screen allows you to check your settings before finalising the gateway.

If everything is correct, click on the Submit button to finalise the process.

You will be taken to the details page for your new gateway.

Step 7 Icon

Connect your gateway to the internet

Next, we need to connect your new gateway to the internet using either Wi‑Fi or ethernet.

If you have an ethernet wall socket or a network switch near where your loggers will be placed, then ethernet is easier than Wi‑Fi and potentially more stable.

However, a strong signal between the gateway and the logger is very important, so if using Wi‑Fi will allow you to place the gateway closer to the logger, then that should be used.

ethernet-port
Ethernet wall socket

Choose how your gateway will connect to the internet

30-DAY FREE TRIAL

You're going to love Clever Logger

To prove it, we’ll send you a Starter Kit to try out for a whole month.

Set it up, have a play, explore the features – obligation free.

If you love it, just let us know.

If not, just send it back.

What is NATA?

The National Association of Testing Authorities (NATA) is the recognised national accreditation authority for analytical laboratories and testing service providers in Australia. It is an independent, not-for-profit organisation that provides independent assurance of technical competence. 

NATA accredits organisations to perform testing and inspection activities for their products and services. This gives consumers the assurance they need to make safe, healthy and reliable choices .

Location Views

In the top right corner of the Location page, you will find the View chooser.

There are three options: Simple, Detailed and Gauge.

change-location-view

Other "How To" articles

Frequently Asked Questions