FAQ
Probably.
With old-fashioned loggers, it was vital for users to regularly download data reports from the logger and save them to their computer. This was necessary for two reasons…
Clever Logger overcomes all these issues.
So, Clever Logger reports are still something a lot of people want, but not many people need.
This post will show you how to filter these emails into a special folder so they are not clogging up your inbox.
When Clever Logger emails you a report, the subject line changes depending on the content of the report.
If there has been a breach, this will be reflected in the email subject …
If there have been no alarms, you can see this at a glance …
We can use this subject line to filter the emails.
Follow these steps to create an Outlook Rule that will sort your No Alarm emails into their own folder.
Step 1
From the Home ribbon, click on Rules, and click on Create Rule.

Step 2
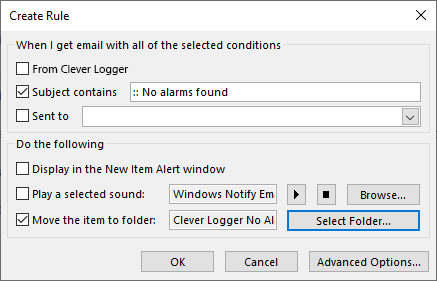
Tick the box next to Subject contains and enter the text :: No alarms found
Step 3
On the same screen, tick the box next to Move the item to folder.
And click on the Select Folder button.
Step 4
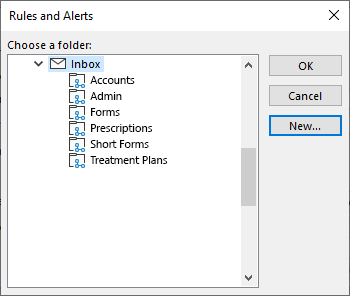
We will create a whole new folder to save these emails…
Click on the New button.
Step 5
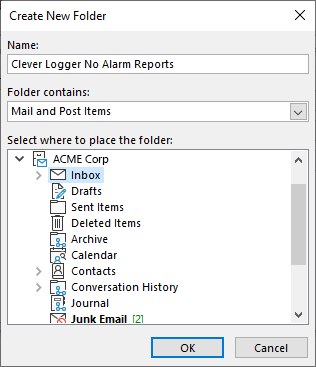
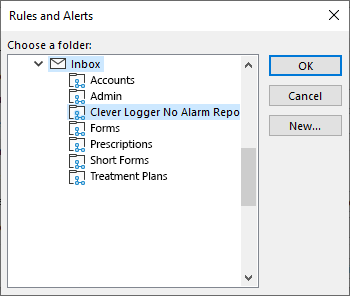
Give your new folder a descriptive name. In this example, we have called it Clever Logger No Alarm Reports.
Step 6
Next we need to choose where the new folder will be created. In the panel below, select the Inbox.
Then click OK.
Step 7
You will now see the new folder in the list. Select it and click OK.
Finished
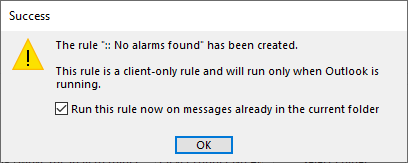
On the success message, you have the option to run the rule on report emails already in your inbox.
Optional steps
If you would like to add some additional filters or actions to your rule, e.g. automatically marking these emails as read, you can explore the Advanced Options in Step 2.
Because the Gmail interface is so customisable, screenshots for this section will not be as relevant.
Step 1
Click on the Settings icon () at the top right of the page.
Then click on See all settings.
Step 2
From the list of options across the top of the page, choose Filters and blocked addresses.
At the bottom of that panel, click on Create a new filter.
Step 3
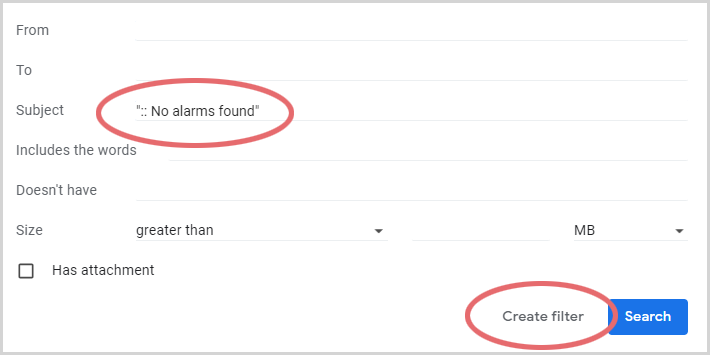
In the Subject field, type the following (including the quotation marks) …
“:: No alarms found”
… and click on the Create Filter link.
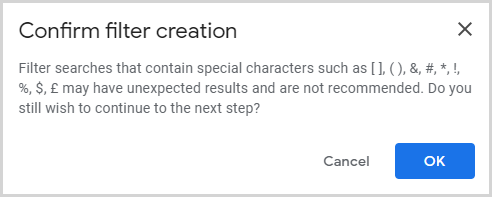
Gmail is not a big fan of having the colons in the search, so it askes you to confirm. Just hit OK.
Next, you need to choose what to do with the emails.
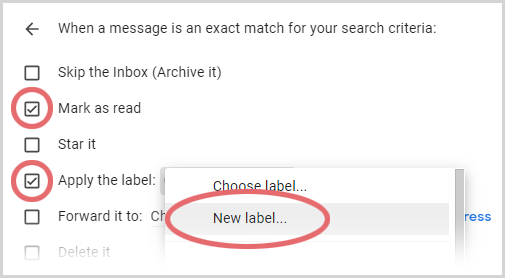
You have various options. We suggest you mark the email as read and apply a label. You will want to create new label e.g. Clever Logger No Alarms
Clever Logger is sold to government departments, public and private hospitals, and other large corporations. We understand that it’s often not possible to purchase with a credit card on a web site.
Call us on 1300 80 88 89 or send an email to [email protected] and we’ll send you a written quote. We are happy to send out most orders on receipt of a verified purchase order.

All prices are in Australian dollars and include GST

KEEP BATTERIES OUT OF REACH OF CHILDREN
Clever Logger loggers are intended for commercial use only. They contain small batteries. Swallowing can lead to chemical burns, perforation of soft tissue, and death. Severe burns can occur within 2 hours of ingestion. Seek medical attention immediately.
To prove it, we’ll send you a Starter Kit to try out for a whole month.
Set it up, have a play, explore the features – obligation free.
If you love it, just let us know.
If not, just send it back.

The National Association of Testing Authorities (NATA) is the recognised national accreditation authority for analytical laboratories and testing service providers in Australia. It is an independent, not-for-profit organisation that provides independent assurance of technical competence.
NATA accredits organisations to perform testing and inspection activities for their products and services. This gives consumers the assurance they need to make safe, healthy and reliable choices .