- Home
- Shop
- Why Clever Logger
- User Guide
Online help pages
- FAQ
Frequently asked questions
Most popular articles
- News
- Login

Prior to 2023, when a new Organisation or Site was created, Clever Logger would create a single default notification group and automatically add users to it.
Now, when a new Organisation or Site is created, two separate Notification Groups are generated. One is specifically for Push notifications (i.e. notifications sent to the mobile phone app), and the other is for Email notifications.
We changed this default behaviour to allow us to be more specific in when we notify you about alarms.
Sent to the Clever Logger app on your phone or iPad
Purpose: Ensure you are aware that there is a problem.
Sent to your email inbox
Purpose: Ensure you have FIXED the problem.
Our recommendation is to split your Notification Groups so that if an issue arises, you will be aware of what is happening and can address the problem before it is too late.
We have made this really easy – you just click a single button.
If you already have some Notification Groups in your Organisation and would like to split them to take advantage of these new default settings, you can do this quite easily. Simply click the ‘View My Notification Groups‘ button below and you will be presented with a list of all your Notification Groups. Just click ‘Split Group‘ next to each that you would like to update, and you’ll be done.
The default settings for these different types of alarms are shown below. You can manually change them on the locations or gateways again later.
“Repeat every” – means how often the alarm notification will be sent to you via Email or Push notification.
“Repeat Until” – is the point at which the alarm notification will stop alerting you. This is either until the alarm has Ended or been Acknowledged on the Clever Logger dashboard. If you are unsure how to manage alarms, please see these articles:
| Group | Enabled | Repeat every | Repeat until |
|---|---|---|---|
| Email Group | Yes | 12 hours | Ended |
| Push Group | Yes | 15 minutes | Acknowledged or ended |
| Group | Enabled | Repeat every | Repeat until |
|---|---|---|---|
| Email Group | Yes | 1 day | Ended |
| Push Group | Yes | 1 hour | Acknowledged or ended |
| Group | Enabled | Repeat every | Repeat until |
|---|---|---|---|
| Email Group | Yes | 1 day | Ended |
| Push Group | No | 1 hour | Acknowledged or ended |
If you have any questions or concerns, please contact us. We’re always happy to help.
Clever Logger is sold to government departments, public and private hospitals, and other large corporations. We understand that it’s often not possible to purchase with a credit card on a web site.
Call us on 1300 80 88 89 or send an email to [email protected] and we’ll send you a written quote. We are happy to send out most orders on receipt of a verified purchase order.


All prices are in Australian dollars and include GST

KEEP BATTERIES OUT OF REACH OF CHILDREN
Clever Logger loggers are intended for commercial use only. They contain small batteries. Swallowing can lead to chemical burns, perforation of soft tissue, and death. Severe burns can occur within 2 hours of ingestion. Seek medical attention immediately.
To prove it, we’ll send you a Starter Kit to try out for a whole month.
Set it up, have a play, explore the features – obligation free.
If you love it, just let us know.
If not, just send it back.

The National Association of Testing Authorities (NATA) is the recognised national accreditation authority for analytical laboratories and testing service providers in Australia. It is an independent, not-for-profit organisation that provides independent assurance of technical competence.
NATA accredits organisations to perform testing and inspection activities for their products and services. This gives consumers the assurance they need to make safe, healthy and reliable choices .
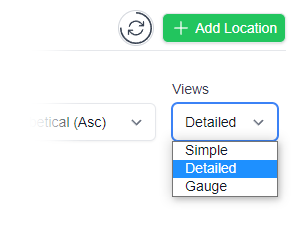
In the top right corner of the Location page, you will find the View chooser.
There are three options: Simple, Detailed and Gauge.
